Google Shopping. Depending on who you ask Google’s eCommerce platform is either the golden path to sales greatness or a costly pile of beans that’ll never turn into that beanstalk.
Much like any advertising tactic since the dawn of commerce Shopping is only as good as the people using it.
That might sound like an insult, but it’s not intended as one.
There are many online guides that promise to unlock Google Shopping greatness, but the reality is there are far easier ways to maximise returns from your campaigns. They just require commitment and consistency.
With that in mind, this article exists to show you a tried and tested method that we use at our agency. A rinse and repeat formula that, should you commit to, is almost guaranteed to turn your Google Shopping campaign into the roaring sales engine we know it can be.
Our base method consists of three actions
- Segment your products
- Regularly review search terms
- Utilise automated bidding
Three actions. Twenty minutes. Let’s dive into this.
1. Segment Your Products
Segmentation, as we always say, is king.
We’ve audited a lot of Shopping campaigns over the years, and a recurring issue we almost always encounter is the lack of product diversification. We almost always see a single campaign comprising of a single adgroup that houses all the products the retailer is selling.
That’s fine if you’re selling a single product, but the chances are high that you’re selling a range of SKUs with different applications and prices.
Google isn’t the most helpful here. By default all products in your product group will be dumped into a single campaign when you’re setting up. This is almost certainly for ease of setup. Within a couple of minutes and a few clicks you’ll be convinced that you’re set up for success.
Unfortunately, it’s virtually impossible to set up a successful Shopping campaign this way.
It’s going be quite difficult to quickly understand what products are performing well if all SKUs are grouped together.
To see what’s actually selling you’ll either have to look in Analytics, or the back end of your eCommerce platform, or pull a Dimensions report from Google that will give you performance by Item ID. Effort.
What you need is to be able to quickly and easily see what is working and what isn’t within your campaign manager AND have the ability to make changes based on it after.
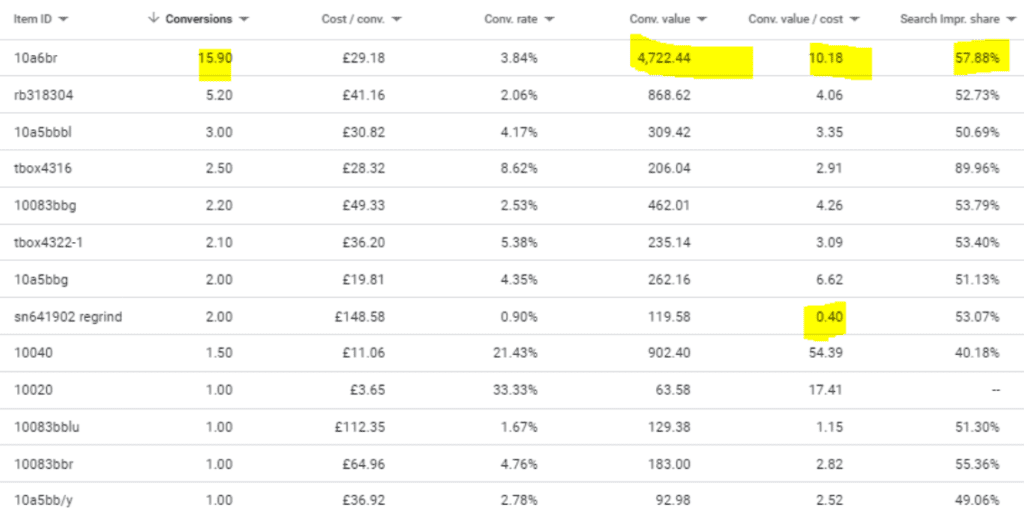
Segmentation using Dimensions Report
Take the below dimensions report for example. I can quickly see for this business that we’ve got one SKU spending more money than it is making (and taking a big chunk of the budget with it), another that’s spending a lot, but making £10 per £1 spent.

There are also 2 products that are getting hardly any clicks, but have AMAZING returns.

But NONE of that is visible at a glance in my campaign manager with the single campaign, single adgroup setup.
Based on my findings, backed up by data, I want to increase the reach of the two performing products, and potentially turn off or at least dial down on the products that are losing me money.
But with the single campaign, single adgroup current format I have no way to do that.
By segmenting products into separate adgroups and campaigns I now have the ability to not only see what products are performing well, but also what types of products are doing well.
I can quickly and easily make adjustments on a group or product basis based on the data. In this instance if certain products are selling better overall I can quickly up all the product bids there, if there is a particular item that’s costing lots but not selling I can pause it or dial things down.
The easiest way to achieve this segmented approach is to use Custom Labels. Custom Labels allows us to break up the product feed and group by things like brand, category (t-shirts, hats), high and low margins, best selling products, or even seasonal favourites.
Segmentation in action
Here is an example of such an account that we took over.
On the surface, the campaign is getting traffic and is running at a profit HOWEVER the cost/conversion is way higher than what the business owner wanted it to be.
This customer has over 10,000 product lines, and without any segmentation, it is very difficult to see what is selling and what’s not from their Google Shopping activity, and to optimise accordingly.
As a result of our segmentation and subsequent optimisation (more on that in a bit) was that we were able to reduce the cost per conversion by 52% in just 3 months. This was because we could reduce bids on those brands that were failing to convert, and put more budget into those that converted at a much lower cost.
The result of lowering that cost per conversion we have been able to continue to scale up their Google Shopping budgets, to bring them more sales for a much lower cost.
If you do any of the things we’re recommending in this article, make sure it’s this one.
2. Review Search Terms…Regularly!
I can hear the groans already.
There is no “dark magic or science” behind a successful Google Ads campaign. Sorry.
There is just a rinse repeat process that must be followed with conviction. Now that doesn’t necessarily mean hours upon hours of mind-numbing spreadsheets – although it might if you have 10,000 products – it just highlights the need for a optimisation routine that you actually stick to.
Reviewing search terms reports is not glamorous, but it can be the difference between a campaign that turns a profit, and one that just hemorrhages cash.
A surprising number of advertisers don’t bother with search terms for Shopping, probably because there’s no keyword setup and the search queries will only trigger an ad based when a query related to the info in the product feed.
But this doesn’t mean they’re not important, as the below example painfully demonstrates:

Our example advertiser doesn’t sell hydrochloric acid products, and yet their products are being paired with completedly unrelated searches. Searches that we can block in a couple of seconds with negative keywords.
Depending on the size of your campaign a search terms report can take 10 minutes or a couple of hours to properly go through. If time is at a premium I’d suggest sorting by total clicks or cost to highlight the terms that might be costing the most. On the flip-side sort by the conversions metric to give you a review on the terms that might be generating sales and work those terms into your PLAs if relevant and not there already.
3. Carefully Introduce Automated Bidding
Automated bidding isn’t exactly new, but it’s become much smarter and more effective over the past couple of years, and if it’s not something you’re testing at the moment it’s definitely one to add to the list.
Automated bidding takes the heavy lifting and guesswork out of setting bids to meet your performance goals.
It uses advanced machine learning algorithms that train on data at a vast scale to help Google to make more accurate predictions across your account about how different bid amounts might affect conversions or conversion value. Each type of automated bid strategy is designed to help you achieve a specific goal for your business.
These algorithms factor in a wider range of parameters that affect performance more than a single person or team could compute – this includes attributes like device and location, which are available as manual bid adjustments, plus additional signals and signal combinations exclusive to Smart Bidding.
With auction-time bidding, Google factors in these wide range of signals into the bid.
For example, Google Ads can optimise bids based on how your product price compares to other advertisers who are participating in the same auctions that you are. For example your bids may be increased if you’re offering a strong deal on a product set compared to other advertisers.
Google can also optimise bids based on similar product attributes across products such as price, condition, brand and product category. For example, a retailer selling outdoor gear, bids may be adjusted if you add a new tent to your product data that’s similar to other tents that have a high conversion likelihood.
There are a number of automated bidding strategies that can be deployed.
Enhanced Cost Per Click
Enhanced cost per click, or ECPC, can help increase conversions for manual bidding.
It automatically adjusts your manual bid up or down based on each click’s likelihood to result in a conversion.
This is the default bid strategy selected when you set up a campaign, and you can choose to optimise the bids for conversions, or for conversion value.
You don’t get to put a cap on the bids with Shopping like you can with Search, but Google will try to maintain the same overall spend.
To use Enhanced CPC with Shopping campaigns, you’ll need to set up conversion tracking.
The Google Ads system looks for patterns of clicks and conversions and compares them to your past results. If certain locations lead to more sales, for instance, it will know. You’ll get optimal performance if you use conversion tracking with ECPC.
Target Return on Ad Spend (ROAS)
Target ROAS is the average conversion value you’d like to get for every pound you spend on ads. Enter a value as a percentage using this formula: conversion value ÷ ad spend x 100% = target ROAS percentage
For example, if your goal is to get an average of £5 in sales for every £1 you spend on ads, your target ROAS would be 500%.
Google Ads sets bids to try to achieve an average return on ad spend (ROAS) across all campaigns using this strategy. Some conversions may have a higher or lower return than your target.
Maximise Clicks
With this strategy, Google Ads automatically sets your bids to help get as many clicks as possible within your budget.
You can set a cap on bids when using a Maximise clicks bid strategy. It lets you control the maximum amount that you’re willing to pay for each click. If you don’t enter a maximum CPC bid limit, Google Ads adjusts your bids to try to get you as many clicks as possible while spending your budget.
This doesn’t require conversion data and is a great solution for increasing clicks on low-traffic products while keeping within a certain spend.
Automated Bidding in Action
Now you’re reading this because you’re looking to acquire more sales. Well I’ve seen first-hand how testing automated bidding on shopping campaigns can do just that.
For one of our clients here that sells home electrical goods, we switched to a target ROAS bidding model for their Shopping campaign segmented for laptops.
Here you will see there was a 92% increase in sales following on from the introduction of target ROAS bidding.
In this case the uplift was enough to also increase the average monthly ROAS from just under 13 (or 1,300%) to just under 15.
Another example for a client of ours that sells low-value accessories to build your own micro-computers.
For this account, we run the account to a target ROAS of 10, but were struggling to get results in one of their broader shopping campaigns that housed a range of the less popular brands they stock.
Here we switched up the bidding to utilise target ROAS and saw an impressive 171% increase in conversions – triple the revenue, and a ROAS that was above our target.
The arrow marked the moment we switched to the automated strategy. Quite a difference!
These are 2 of our most recent examples of how automated bidding can make a huge difference to a campaign.
It is worth noting that often the Target ROAS largely just continues the previous ROAS performance — which is what we saw across most campaigns. BUT we do for the most part see an increase in overall sales.
I do also want to make it clear that we have also seen it negatively affect performance in a couple of cases, it doesn’t always work. BUTt unless you test, you won’t know if it could positively impact your campaigns.
Key Benefits of Automated Bidding
#1 Save Time Continually Changing Bids
Providing you can get your campaign running at a similar ROAS, the real benefits of automated bidding is in the time it can save you that was previously spend trying to get bids right.
Instead, you can focus on high-level goals and allow Smart Bidding to set the right bid for you. Whether you’re trying to drive more visitors to your site or more revenue to your business, automated bidding allows you to start concentrating on overall performance of the campaign.
#2 Takes into consideration historical performance and future goals
Your campaign’s historical performance and future goals are always taken into account. Just enter the performance goals to meet, and the automated bid strategy will respond in real time, accounting for your campaign’s past clicks or conversion data.
#3 It can outperform manual bidding to drive more sales
And finally, as I’ve just shown with our customer examples, it can lead to improved acquisition rates.
Automated Bidding Top Tips
#1 Check your Conversion Tracking is set up correctly
Check your conversion tracking is set up correctly – make sure the key conversion is tracking accurately and being counted in your conversions. Switch non-essential conversions off.
Also, understand and consider your conversion attribution windows Understand and consider your conversion attribution windows. This is important as you may need to account for conversion delays. Some conversions take more time than others, in some cases up to days or even weeks. If you compare recent performance with past performance, your recent performance might not look as strong because of conversion delay.
#2 Feed the algorithms first. Then be patient.
A crucial tip, this.
Whilst Google says even new campaigns without data of their own may see increased performance from past performance, we’d recommend gathering some data for Google to work with first. Google recommends measuring performance over longer time periods that have at least 30 conversions, such as a month or longer (or 50 conversions for Target ROAS)
Once live give the campaigns enough time to learn and optimise. Google recommends a min of 15 days, we’d suggest a month. Also consider reviewing your data weekly as opposed to daily, especially if there’s little traffic.
Your cost per click may go up or your number of clicks may go down, but Google may be making savings to bid higher when a conversion or a high-value conversion seems more likely or the bid strategy may be reducing bids for clicks that don’t meet your target.
#3 Set your campaigns with appropriate product groupings that have the goals in mind
Set your campaigns up with the goals in mind – if you have different targets for different product groupings, then you want to have dedicated campaigns in place to allow Google to optimize to those different goals. For example, your target ROAS may be different for different products, or you might want to put a higher bid cap on campaigns that sell more expensive items.
#4 Remember that a number of factors may affect your results over a period of time
Consider that a number of factors may affect your results over a period of time. Your results may be affected by holidays, weekends, special events, changes to your feed and your competitors in the auction.
Conclusion
There’s no doubt that Google Shopping can be a bewildering jungle to begin with. But with a little time, patience, and this process in place you can unlock sales at a fraction of the cost you were paying before.
Just remember the three processes:
- Segmentation is king (or queen)
- Regularly review your search terms
- Be brave and give automated bidding a fair test


